Perform System Restore in Safe Mode
The System Restore feature in Windows 10 allows you to create a time stamped backup of System Files, Registry Files and System Settings on your computer. If your computer is going through problems, you can make use of this saved “System Restore Point” to undo any recent changes, which might be responsible for the problems on your computer. In many cases, problems on the computer can be fixed by performing a regular System Restore, while you are normally logged into the computer. In certain cases, you may find it necessary to boot computer in Safe Mode and perform System Restore in Safe Mode.
System Restore Windows 10 in Safe Mode
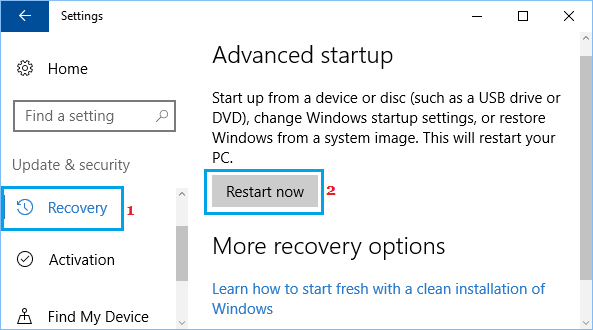
Note: If you are unable to login to the computer, you can enter Safe Mode using a bootable USB Drive. If you are already logged-in, go to Settings > Update & Security > select Recovery in the left-pane. In the right-pane, scroll down and click on the Restart Now button, located under “Advanced Startup” section.
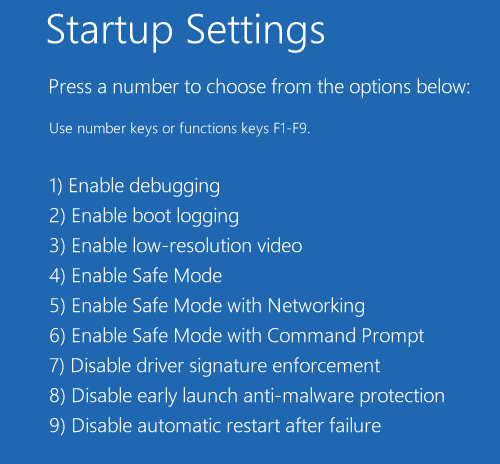
After computer restarts, go to Troubleshoot > Advanced options > Startup Settings and click on the Restart button.
Once the computer restarts, press the F4 key and it will boot or Start in Safe Mode.
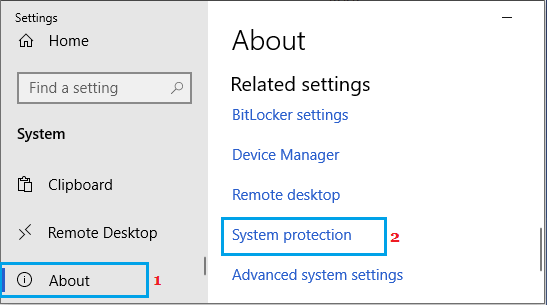
After the computer starts in Safe Mode, go to Settings > System and select the About tab in left-pane. In the right-pane, scroll down and click on System Protection link, located under “Related Settings”.
On the next screen, click on the Next button.
On next screen, select the Restore Point that you want to use and click on the Next button.
Patiently wait for the Restore Process to be completed (you will see a pop-up indicating the progress of Restore process). Once the Restore Process is completed, you will see a pop-up informing that your System has been restored. The System Restore Process will roll back your computer to its previous state (when the Restore Point was created), undoing recent changes that must have caused the problems on your computer.
How to Restore Windows 10 Computer Using System Image How to Factory Reset Windows 10 Computer


