Nowadays, a webcam is one of the most accessed tools on the PC, and any kind of disturbance in this is unbearable. And, it’s really irritating to face an issue like a webcam camera not working on Windows OS. In addition to this, recently a lot of Windows 11 users complained about the bad or incorrect behavior of their camera. Be it an HP, Dell, or Asus, the issue occurs in the laptop of every label. Especially, after upgrading the OS to Windows 11, the problem has become across-the-board. But, the good news is that the issue is solvable. In this tutorial, we are going to discuss some tested and tried approaches to fix laptop camera not working on Windows 11.
100% Working Solutions to Fix Camera Not Working on Windows 11 PC
Have a look at the below-mentioned effective solutions to find and fix the Windows 11 camera not working issue. There is no need to give all of them a try, simply make your way through each and pick the one that goes very well for you.
Solution 1: Restart your Computer
Whenever you observe that your camera is not functioning properly, then the simplest way to make it work again is to reboot your system. However, it might sound too simple, but sometimes it fixes your camera problems and works like magic. So, if you haven’t attempted this yet, you should surely give it a try. Don’t worry, if this didn’t work for you, there are numerous other solutions that you can try. Also Read: How to Fix Windows 11 Keeps Crashing {Solved}
Solution 2: Check for a Physical Switch
Many laptops or external cameras are equipped with a physical switch for turning on or off the camera. So, if that switch is off, you won’t be able to access the camera. Hence, it would be better to check if there is any button or physical switch for the camera on your system. If there is, then just be sure it’s enabled.
Solution 3: Use Another USB Port
The users who are using an external camera, just make sure that it is firmly connected. You can also consider unplugging your external camera and then plugging it back into the port. Sometimes, your USB port is also responsible for the issue, so you can also try to connect your camera to another port. This might resolve the problem. If this doesn’t trick you, then have a look at the other solutions mentioned below.
Solution 4: Update your Camera Driver
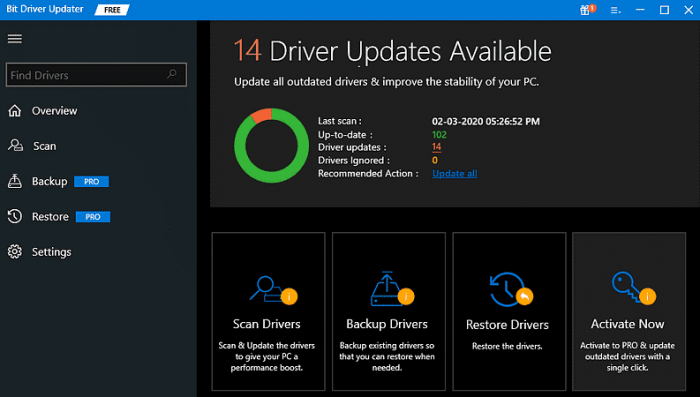
If your camera driver becomes unresponsive and goes missing or out of date, then your camera won’t work properly as expected. So, you should keep your camera drivers always up-to-date in order to ensure its smooth operation on your PC. The user can update their outdated camera drivers manually, by going to the official website of the manufacturer. Later on, find the correct driver installer according to your Windows OS version and install it by following the on-screen instructions. But if in case, you have no time, patience, or good computer skills to install drivers manually, then you can perform the same task automatically with Bit Driver Updater. Bit Driver Updater is a driver updater utility tool used by millions of PC users across the world. The driver updater program will automatically detect your system and discover the relevant drivers for your camera. Also, you do not need to know exactly what OS version your PC is running. No risk of downloading and installing the incorrect driver. Bit Driver Updater will take proper care of all the work for you. Here is how to update outdated drivers with Bit Driver Updater: Step 1: First of all, download Bit Driver Updater for Free by clicking on the button below.
Step 2: Next, open the downloaded file and follow the installation wizard to complete the process. Step 3: After that, launch the Bit Driver Updater on your PC and click on the Scan option.
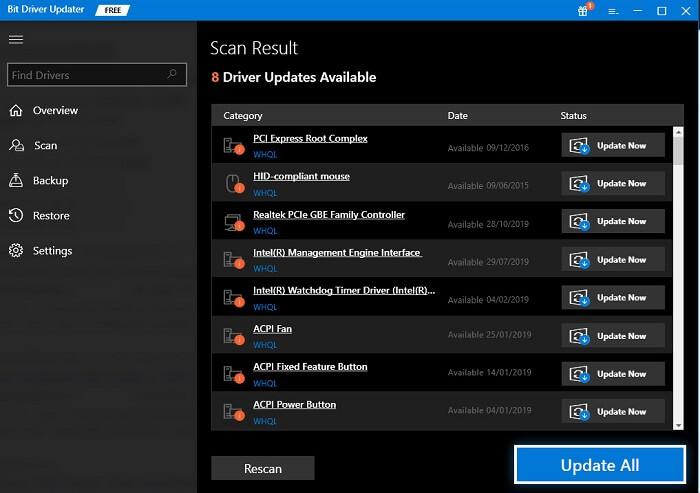
Step 4: Wait and let the driver updater find the drivers that need to be updated. Step 5: Then, click on the Update Now button adjacent to the driver you wish to update. You can also click on the Update All button. This will let you update all outdated drivers within one click.
However, this requires you to upgrade to the pro version of Bit Driver Updater. Furthermore, the pro version comes with 24/7 technical assistance and a 60-days full refund guarantee. After updating your camera or other drivers, reboot your PC and try to access your camera in order to test the issue. If the problem persists, then move on to the last resort. Also Read: How to Update Logitech Mouse Driver In Windows 11,10 PC
Solution 5: Reinstall your Camera Driver
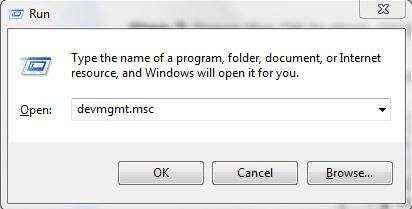
Last but not least, you can also try to reinstall your camera driver to resolve the webcam not working on Windows 11. Because, sometimes, the corrupted camera driver leads to camera malfunctions. For reinstalling the camera driver, you need to first uninstall the currently installed version of the camera driver. Here is how: Step 1: Open the Run Dialog box utility by altogether pressing the Windows + R keys from your keyboard. Step 2: Next, write devmgmt.msc inside the box and click on OK.
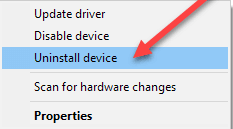
Step 3: In the Device Manager window, find and double click on the Cameras or Imaging Devices to expand its category. Step 4: Click right your camera and choose Uninstall Device from the context menu list.
Step 5: Click on Uninstall to affirm your actions. Wait for the process to be successfully completed. Once done, reboot your PC and now Windows will automatically find and install the missing or broken camera drivers for your device. Also Read: How to Track Internet Usage in Windows 11 {2022 Guide}
Laptop Camera Not Working on Windows 11: FIXED
We hope the above resolutions help you fix Windows 11 camera, not working issues. Please drop your queries or further recommendations in the box below. Was this tutorial guide helpful? Want to read more tech-related blogs or articles? If yes, then do subscribe to our Newsletter. Moreover, you can also follow us on our social media channels: Facebook, Twitter, Instagram, and Pinterest.


