Whenever you are not available to take a call, voicemail comes in handy. It saves you from having to miss opportunities because of a missed call. You can go through the message left on the voicemail and contact the caller accordingly. However, it becomes pretty frustrating if the voicemail is not working on the iPhone. Many users have reported a voicemail error on iPhones. Hence, in this article, we will share some tried and tested fixes to get rid of this issue. You may continue reading this write-up if you are also struggling with the same problem. Before beginning with troubleshooting, it is vital to understand why the iPhone voicemail is not working. You can fix the problem effortlessly if you know what may have caused it. Therefore, the following section answers one of the most frequently asked questions, “why is my voicemail not working on my iPhone.”
Why Is Voicemail Not Working on iPhone
The following may be the top reasons you are not getting voicemails on your iPhone.
Random software glitchesPending Carrier updateCall forwarding is activeIssues with the cellular settingsConflicts between Bluetooth and cellular network
Above, we listed probable reasons your iPhone voicemail is not working. Now, let us walk you through the possible ways to fix it.
Fixes for Voicemail Not Working on iPhone Issue
Below we share the fixes you may use to solve the problems leading to the voicemail not working error on iPhone 11 and other iPhones.
Fix 1: Start your iPhone again
Restarting the iPhone may fix the random software issue that may be a reason voicemail is not working on the iPhone. Therefore, below is how to restart your iPhone to fix the issues.
Navigate to and tap Settings on your phone.Select the General settings.Tap on the Shutdown option present at the bottom.Slide to power off your iPhone.
Also Read: How to Enable Do Not Disturb on iPhone
Fix 2: Get the Carrier updates installed
Voicemail on iPhone may not be working as you have pending Carrier updates that need installation. Thus, installing these updates may fix the problem you are experiencing. Below is how to install them.
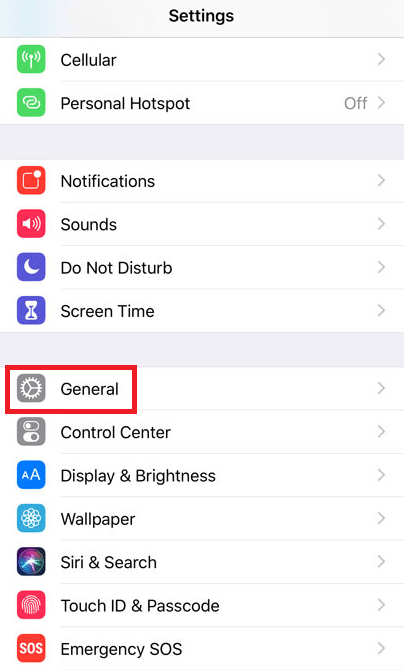
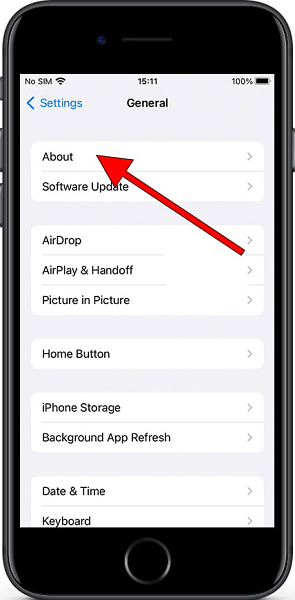
Go to your iPhone’s Settings. Select General from the available options.Tap on the About option.Tap on the Network setting.Choose Update to complete the Carrier update installation on your phone.
Fix 3: Turn off call forwarding
Do you have the call forwarding setting enabled to forward unanswered calls to any phone? If yes, you should turn off call forwarding to fix the voicemail not working iPhone issue.
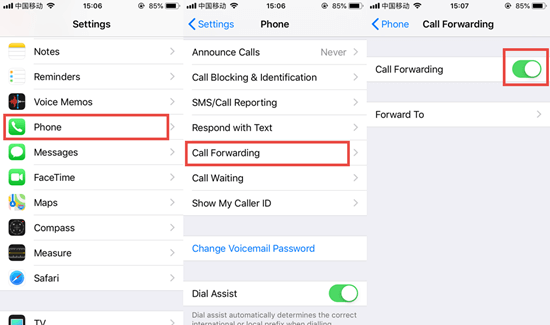
Open Settings and tap on Phone. Go to Call Forwarding. Turn off the Call Forwarding toggle.After disabling call forwarding, check if things have returned to normal or still voicemail is not working on the iPhone.
Also Read: Sync Contacts From iPhone to Mac
Fix 4: Switch off cellular service and turn it on again
Switching off the cellular service and then turning it on often fixes problems with the cellular settings. Hence, you may take these steps to perform this action to fix the voicemail not working on iPhone 11 issue.
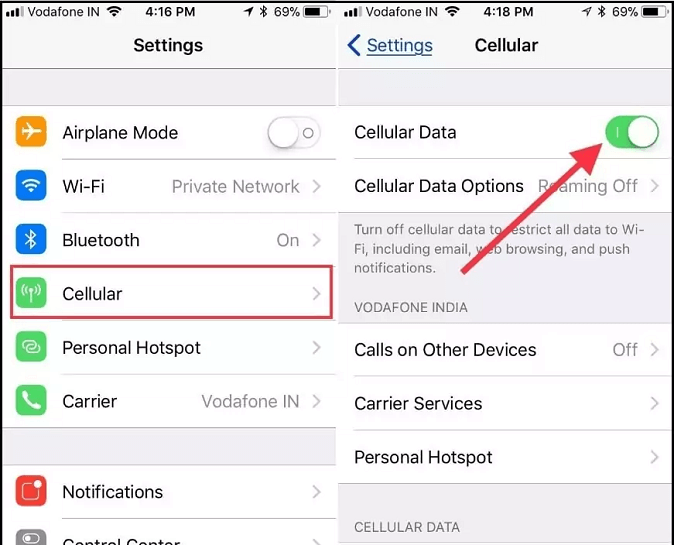
Open your phone’s Settings. Go to the Cellular settings and toggle Off cellular data.Keep the cellular data off for 30 seconds.Now, toggle on the cellular data.
Fix 5: Toggle off Bluetooth
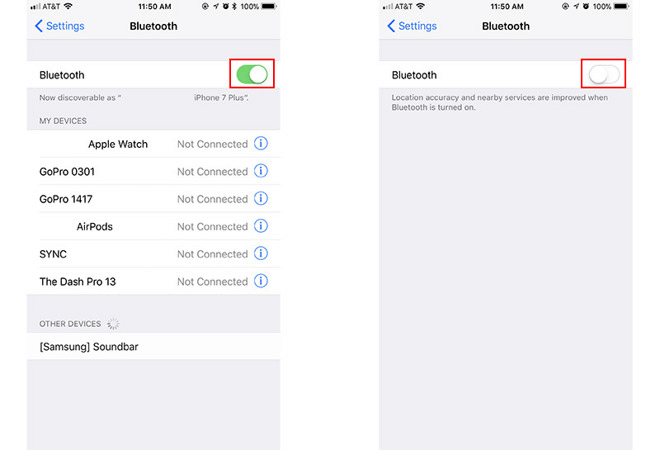
Bluetooth networks may often interfere with the cellular network, resulting in problems like the voicemail on the iPhone not working. Therefore, turning off Bluetooth is one thing you can do to fix the problem. Below are the directions to do it.
Go to your iPhone’s Settings and select the Bluetooth setting.Tap on the Bluetooth toggle to turn it off.See whether the iPhone voicemail is not working or if the issue is resolved.
Fix 6: Reset your phone’s network settings
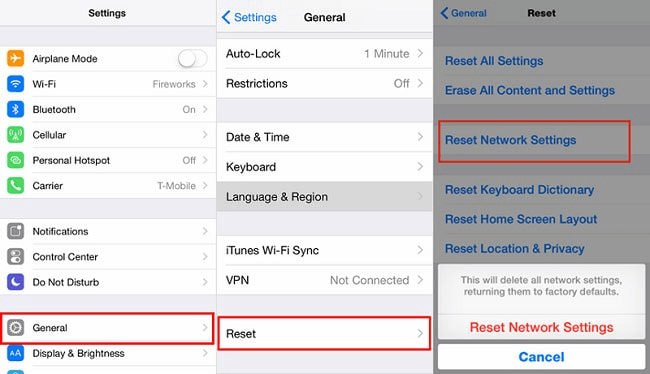
Resetting the network settings to the original factory default settings is another way to fix the voicemail not working on iPhone 11 issue. Thus, below is the step-by-step process to do it.
Choose Settings. Tap on the General settings and Transfer or reset iPhone. Select Reset and then Reset Network Settings. Enter your Lock Screen Password if asked to do it.Complete the reset process and see if the problem is solved or if you are still not getting voicemails on your iPhone.
Also Read: Fix: Share My Location Not Working on iPhone
Fix 7: Correct the date and time
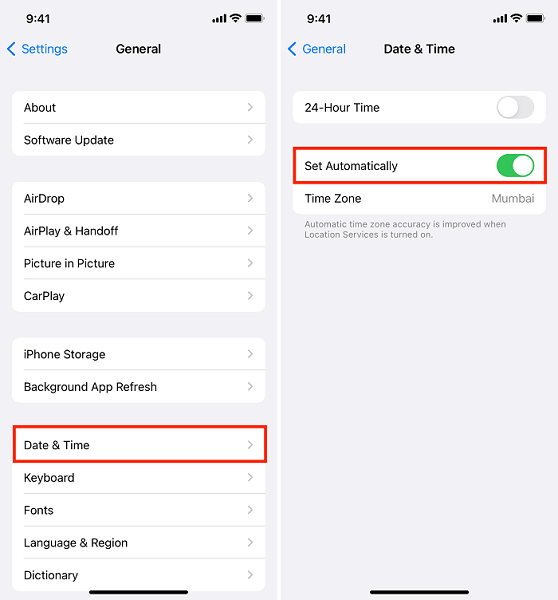
It may happen that you have incorrect data and time on your phone. Wrong date and time settings may sometimes cause problems such as the voicemail on the iPhone not working. Thus, below is how to set the correct date and time on the iPhone to solve the problem.
Go to Settings and open the General setting.Choose Date & Time. Toggle on the Set Automatically option to set the date and time on your phone.
Fix 8: Call your voicemail
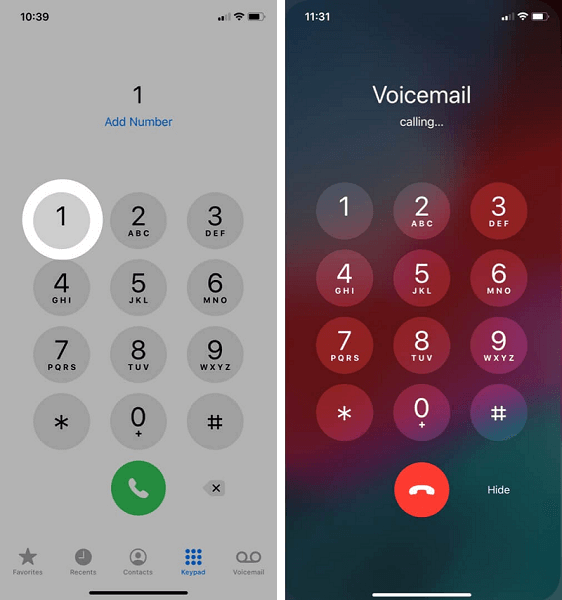
You may also access and check the voicemail by calling it directly. Here are the directions to do it if the voicemail is not working on the iPhone.
Go to your iPhone’s keypad. Press 1 and hold it for a couple of seconds.Now, you may check the voicemail on your iPhone if it is not working.
Fix 9: Force close the phone app and open it again
You may close the phone app and reopen it to fix the voicemail on the iPhone not working problem. The following is the way to do it.
Swipe up to view all your open applications.Swipe up once more.
If you are using iPhone 8 or earlier, you may press the home button twice and then swipe up again. Close the phone and relaunch it to check if the problem is gone or still the voicemail is not working on iPhone.
Fix 10: Get in touch with Apple Support
If none of the above fixes help you fix the iPhone voicemail not working error, the issue may require expert assistance. Hence, you may contact Apple Support to solve the problem. To get Apple Support’s help you may visit the official website or go to the nearest Apple Store. Also Read: [FIXED] Last Line No Longer Available on iPhone
Voicemail Not Working on iPhone: Fixed
Through this article, we discussed the possible solutions to the iPhone voicemail not working problem. You may try them sequentially till the issue is resolved. If you know any other better way to solve the issues due to which you are not getting voicemails on your iPhone, you may share it via the comments section. You may also drop us a comment in case of any doubt or confusion regarding this write-up. Lastly, we hope you will remain in touch with us for more tech updates and information.
